Android Fundamentals – Kiến Thức Cần Thiết
Đây là mảng kiến thức cơ sở, quan trọng nhất cho tất cả lập trình viên Android cần phải thông thạo. Bạn có thể skip đọc Blog này và tham khảo source code mẫu mình để tại GitHub đây nhé!
Bốn yếu tố của tất cả các ứng dụng Android (The 4 Pillars of an Android Application)
Activity
Activity là thành phần cơ sở, cốt lõi nhất để xây dựng một ứng dụng Android Mobile. Mỗi Android Activity đại diện cho một màn hình cụ thể mà người dùng có thể tương tác. Trong một vài trường hợp đặc biệt, Activity có thể transparent và không nhận tương tác từ người dùng tuy nhiên để tránh lan man trong quá trình học mình sẽ không nhắc đến vấn đề đó trong khóa học lập trình android này.
Vai trò của Activity
- Thành phần cơ sở xây dựng lên giao diện màn hình ứng dụng
- Nơi truy cập, cấp phát và quản lý tài nguyên của ứng dụng thông qua vòng đời của Activity (Activity’s Lifecycle)
- Nhận và xử lý các sự kiện từ người dùng (Touch, Sensor, Vibrate, ..)
- Là cầu nối để giao tiếp với hệ điều hành (Xin quyền, mở deep-link, thanh toán, …)
Cách bắt đầu một Activity
Để bắt đầu một Activity bất kỳ trong Android chúng ta cần có các yếu tố sau:
Context: Context ở đây có thể là Application Context hoặc Activity Context, hoặc Fragment Context, hoặc là Context bất kỳ trong chương trìnhMain Thread: Việc thực thi bắt đầu một Activity chỉ có thể được thành công khi thực thi trên Main Thread. Chi tiết về Main thread trong khóa học mình sẽ đề cập ở các bài sau.
startActivity(Intent(context, NewActivity::class.java))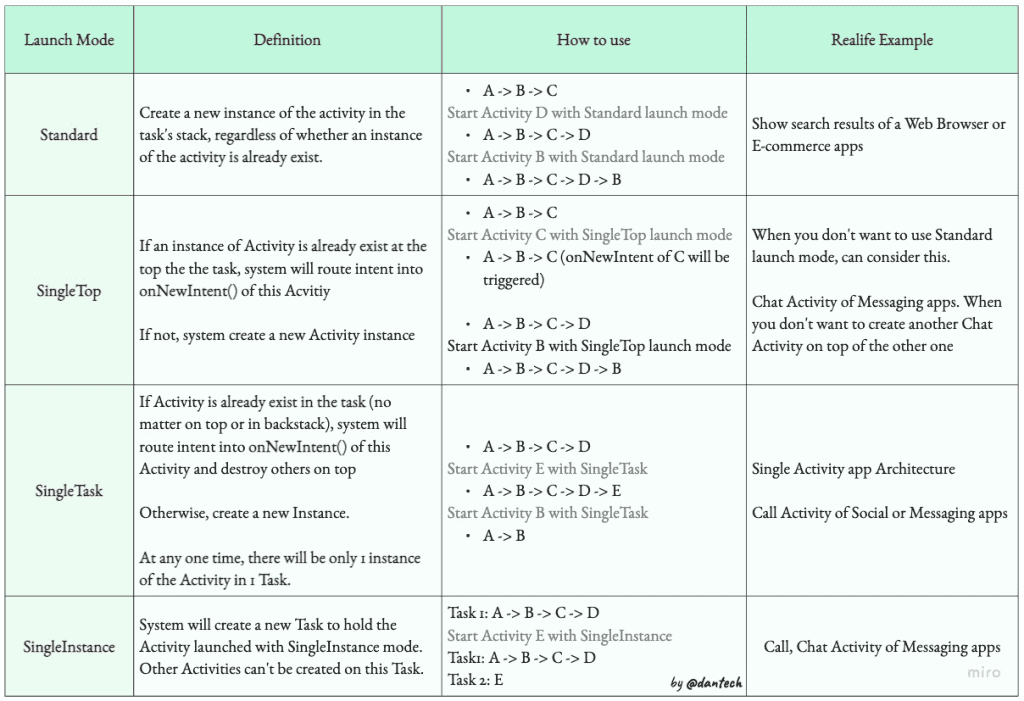
Service
Android Service là một thành phần trong Android Framework cho phép ứng dụng chạy các tác vụ trong background.
Dựa vào tính năng có thể chia thành 3 loại Service trong Android
Foreground Service
- Foreground Service: Là Service
chạy ngầmnhưng User có thể nhận biết biết rằng đang có 1 Service đang chạy ngầm tại 1 thời điểm nhất định. Các loại Service này có thể kể ra như: Download file, Play audio, Sync Data, … Các Foreground Service trong Android có lifecycle dài hơn, và trong trường hợp Service nàybị kill bởi hệ điều hành, nó sẽ tự restart và tiếp tục chạy.
Background Service
- Background Service: Là Service
chạy ngầmnhưng User không nhận biết được rằng đang có 1 Service đang chạy ngầm. Ví dụ Service thực hiện collect log và gửi lên server, Service scan bộ nhớ máy, Service dọn rác, …
Bound Service
- Bound Service: Là Service
chạy ngầm, nhưng Service này đượcbind(trói buộc) với một hoặc nhiều Application Component nhất định – có thể là Activity, hoặc 1 Service khác. Bound Service hỗ trợ các tính năng nâng cao mà chúng ta chưa vội sử dụng trong chương trình này. Ở thời điểm hiện tại, bạn có thể chấp nhận rằng Bound Service là một loại setup đặc biệt để Service có thể bind với các Application Component khác để tương tác và trao đổi data. Bound Service còn có thể hỗ trợInterprocess Communication (IPC)
Dựa vào thiết kế code, chúng ta chỉ có duy nhất 1 Class Service với đầy đủ option để tạo nên 3 dạng Service ở trên.
class ForegroundService : Service() {

    private val channelId = "ForegroundServiceChannel"
    private val notificationId = 1
    private val sharedPrefFile = "com.creative.androidfundamentals"
    private val dataField = "dataField"
    private var job: Job? = null

    private var init = -1

    override fun onCreate() {
        super.onCreate()
        Log.d("ForegroundService", "onCreate $this")

    }

    override fun onBind(intent: Intent): IBinder? {
        return null
    }

    override fun onStartCommand(intent: Intent?, flags: Int, startId: Int): Int {
        createNotificationChannel()
        startForegroundService()
        return START_STICKY // START_NOT_STICKY
    }

    private fun createNotificationChannel() {
        if (Build.VERSION.SDK_INT >= Build.VERSION_CODES.O) {
            val serviceChannel = NotificationChannel(
                channelId,
                "Foreground Service Channel",
                NotificationManager.IMPORTANCE_DEFAULT
            )
            val manager = getSystemService(NotificationManager::class.java)
            manager.createNotificationChannel(serviceChannel)
        }
    }

    private fun startForegroundService() {
        val notification = getNotification(0)
        startForeground(notificationId, notification)

        job = CoroutineScope(Dispatchers.IO).launch {
            while (isActive) {
                val sharedPref: SharedPreferences = getSharedPreferences(sharedPrefFile, Context.MODE_PRIVATE)
                val data = sharedPref.getInt(dataField, 0)
                init += 1
                sharedPref.edit().putInt(dataField, data + 1).apply()
                val manager = getSystemService(NotificationManager::class.java)
                manager.notify(notificationId, getNotification(data))
                Log.d("ForegroundService", "Data: $data ${this@ForegroundService}")
                if (init >= 20) {
                    Log.d("ForegroundService", "Stop service ${this@ForegroundService}")
                    stopSelf()
                    return@launch
                }
                delay(3000)
            }
        }
    }

    private fun getNotification(data: Int): Notification {
        return NotificationCompat.Builder(this, channelId)
            .setContentTitle("Foreground Service")
            .setContentText("Data: $data")
            .setSmallIcon(R.drawable.ic_launcher_foreground)
            .build()
    }

    override fun onDestroy() {
        super.onDestroy()
        job?.cancel()
        Log.d("ForegroundService", "onDestroy $this")
    }
}
Ví dụ cách sử dụng Android Service – Khóa học Android Mastery
Trường hợp gọi startService nhiều lần liên tục. Service sẽ không khởi tạo lại, nhưng hàm onStartCommand sẽ được gọi lại.
Trong chương trình này để tránh lan man, ta không thực hiện các ví dụ liên quan đến Bound Service!
Broadcast Receiver
Broadcast Receiver giúp ứng dụng Android gửi và nhận data. Việc gửi và nhận data này có thể thực hiện trong 1 app (Data được gửi từ 1 Context đến Broadcast Receiver) hoặc là giữa các ứng dụng với nhau.
Trong dự án thực tế chúng ta có thể sử dụng Broadcast Receiver trong các trường hợp sau:
- Sự kiện máy khởi động lại ACTION_BOOT_COMPLETED
- Sự kiện thay đổi Pin
ACTION_BATTERY_LEVEL_CHANGED - Sự kiện độ sáng màn hình thay đổi
ACTION_SCREEN_ON - Sự kiện bật màn hình
ACTION_SCREEN_ON - Lên lịch Notification sử dụng
AlarmManager
Tham khảo ví dụ code của Broadcast Receiver theo code sample bên dưới:
<receiver android:name=".broadcastReceiver.SimpleReceiver" android:exported="true">
    <intent-filter>
        <category android:name="android.intent.category.DEFAULT"/>
        <action android:name="android.intent.action.BOOT_COMPLETED" />
    </intent-filter>
</receiver>
class SimpleReceiver : BroadcastReceiver() {
companion object {
const val SIMPLE_ACTION = "com.creative.androidfundamentals.SIMPLE_ACTION"
}
override fun onReceive(context: Context?, intent: Intent?) {
Log.d("SimpleReceiver", "SimpleReceiver onReceive ${intent?.action}")
if (intent?.action == Intent.ACTION_BOOT_COMPLETED) {
if (Build.VERSION.SDK_INT >= Build.VERSION_CODES.O) {
context?.startForegroundService(Intent(context, ForegroundService::class.java))
} else {
context?.startService(Intent(context, ForegroundService::class.java))
}
} else if (intent?.action == SIMPLE_ACTION) {
// Do something
}
}
}
// MainActivity
...
registerReceiver(SimpleReceiver(), IntentFilter(SimpleReceiver.SIMPLE_ACTION))
sendBroadcast(Intent(SimpleReceiver.SIMPLE_ACTION))
...Content Provider
Content Provider là công cụ Android cung cấp giúp Lập trình viên truy cập và quản lý dữ liệu.
Các dữ liệu này có thể được chia sẻ giữa các App với nhau trong hệ điều hành, hoặc chỉ được truy cập và sử dụng internally.
Trong nội dung khóa học này ta sẽ tìm hiểu cách sử dụng Content Provider để truy cập vào các dữ liệu được chia sẻ chung trong ứng dụng Android: Danh bạ, SMS, Lịch sử call, …
Việc sử dụng Content Provider để tạo và quản lý dữ liệu Local không còn là 1 giải pháp phù hợp nữa, thay vào đó ta có thể sử dụng Room Database, hoặc Data Store (Trừ trường hợp nâng cao, bạn cần chia sẻ dữ liệu của app cho các bên thứ 3)
Code example để lấy ra các SMS trong điện thoại:
fun getSmsHistory(contentResolver: ContentResolver): List<String> {
        val smsList = mutableListOf<String>()
        val cursor: Cursor? = contentResolver.query(
            // URI trỏ đến bảng SMS
            Telephony.Sms.CONTENT_URI,
            // projection: các column cần lấy ra
            null,
            // selection: Điều kiện WHERE
            null,
            // selectionArgs: Tham số điều kện Where
            null,
            // sortOrder: Sắp xếp thứ tự
            Telephony.Sms.DATE + " DESC"
        )

        cursor?.use {
            val bodyIndex = it.getColumnIndex(Telephony.Sms.BODY)
            val addressIndex = it.getColumnIndex(Telephony.Sms.ADDRESS)
            val dateIndex = it.getColumnIndex(Telephony.Sms.DATE)

            while (it.moveToNext()) {
                val smsBody = it.getString(bodyIndex)
                val smsAddress = it.getString(addressIndex)
                val smsDate = it.getLong(dateIndex)
                smsList.add("SMS from $smsAddress at $smsDate: $smsBody")
            }
        }

        return smsList
    }
Các yếu tố quan trọng khác
Android Manifest
Đây là file dùng để khai báo những thành phần của ứng dụng
- Permission
- Activity
- Broadcast Receiver
- Service
Trong một dự án Android có thể tồn tại nhiều file Android Manifest khác nhau. Tuy nhiên khi build, tất cả các file Android Manifest sẽ được merge lại làm 1 để đảm bảo tính nhất quán.
Android Resources, Assets
Android Resources là thư mục chứa các tài nguyên cài sẵn theo ứng dụng. Có thể liệt kê ra: Animation, Layout, Color, String, Theme, Array, Font, Drawable …
Assets là thư mục chứa các tài nguyên cài sẵn theo ứng dụng. Tuy nhiên muốn truy cập đến Assets phải thông qua URI path, không thể thông qua Resources (R)
Gradle Build
Gradle Build (file gradle.build) là hệ thống những file config để định nghĩa các library, dependency mà một module đang dùng. Đồng thời config các quy luật, tính năng để xây dựng lên nền tảng của ứng dụng.
Trong phạm vi khóa học này chúng ta chưa vội nghiên cứu sâu vào hệ thống Gradle Build. Hãy chấp nhận đây là một hệ thống giúp chúng ta cấu hình dự án, cài đặt các thư viện và các dependencies cần thiết để một module hoạt động đúng.
Local File System
Khi một ứng dụng Android được cài đặt vào máy, mỗi ứng dụng sẽ chiếm một phân vùng bộ nhớ Disk có tên folder chính là tên package name của ứng dụng.
Bên trong folder package này có rất nhiều folder con khác, tuy nhiên sẽ có 2 folder mà lập trình viên được quyền đọc, ghi lên trên đó mà không cần phải request permission từ user.
Folder Cache
Folder cache chứa các file mà ta không có nhu cầu giữ bền. Các file này sẽ được hệ thống tự dọn mà không cần ta can thiệp.
Folder Files
Folder files là nơi chứa các tệp cần thiết cho vận hành của app. File khi được lưu vào folder này sẽ không thể bị tự động dọn bởi hệ thống. Người Lập trình viên cần chủ động dọn dẹp, tối ưu thư mục này để giảm app size.
Ví dụ trực quan về Local File system

lifecycleScope.launch(Dispatchers.IO) {
    val filesPath = "${application.filesDir.absolutePath}/"
    val fileInsideFiles = File(filesPath, "fileInsideFiles.txt")
    if (!fileInsideFiles.exists()) {
        fileInsideFiles.createNewFile()
        fileInsideFiles.writeText("Hello from fileInsideFiles.txt")
    }

    val cachePath = "${application.cacheDir.absolutePath}/"
    val fileInsideCache = File(cachePath, "fileInsideCache.txt")
    if (!fileInsideCache.exists()) {
        fileInsideCache.createNewFile()
        fileInsideCache.writeText("Hello from fileInsideCache.txt")
    }
}
Thực hành ghi File trong Android – Khóa học Android Mastery by Dan Tech.
